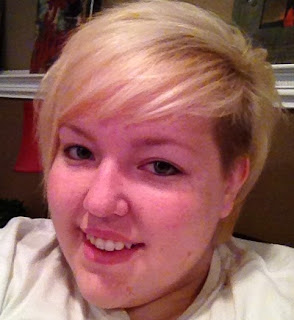
I do have other, expensive nice makeup. I just like this certain eyeshadow set from Bonnebell. It's just one of the many ways I make myself more accessible to you "common folk". SO, in case you haven't guessed, I'm going to show you my eye make up today! I went for a golden/bronzy look I haven't done for a VERY long time. I'm sure you are just overcome with excitement!
The Products we will be using today!

Step #1 -Wash Your Face!
Get all the mascara clumps from your lashes. Flaky mascara=no bueno!
Step #2-Prep your lids!
I have used many a eye primer in my life. Urban Decay makes a good one and MAC has several to choose from. Today I'm using a Shade Stick by MAC. These aren't necessarily for priming. They are for intensifying pigments and for layering different colors. BUT they also prime your eyelid so the makeup stays on better and doesn't crease. The color I used is called Beige-ing. It's beige. Clever, huh? I put it on from lash line to crease and then I use my finger to feather it up to my brow bone. DO NOT let it get really heavy, especially on your brown bone. Bad things will happen.
Step#3- Applying the Eyeshadow
This is where the Bonnebell comes in. Its called Cafe Classics and I use it EVERYDAY. Without shame. The bottom color, the one with the biggest spot, is the perfect color to put all over your lid. From lash line to brown bone. So do it.
Next, I my MAC color pot in Goldmine and put it on from lash line to crease. Start off with a little bit and then add more. MAC's colors are intense, like Indians makin' babies, so a little goes a long way!
Goldmine from lash line to crease

Moving on to the color on the outer corner of my eye.The color I used to today is called Amber Lights by MAC. Now, I don't use brushes very often. I have them but I really just use my fingers. Sounds weird but it works, I promise! I start at the outer corner of my eye, move up and make a 'C' shape into the crease of my eye. When I feel like I have the right amount of color on, I take my finger and rub it down into the other color. Just blend it all around,
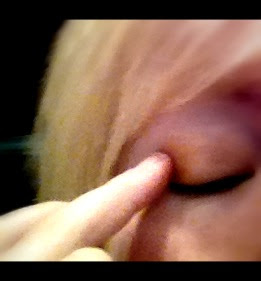 (as you can see in this AWESOME picture) without going above the crease or too far into the inner corner of your eye,until it looks pretty! You can add a little more gold to the inside corner if you'd like. Don't push too hard. #1- cus you'll rub all the color off #2-Ouch.
Step#4-Eyeliner
Eyeliner is all about preference. I prefer a black, soft kohl eyeliner. Some like liquid. While sometime I use liquid liners, I find the soft ones are more forgiving. If your line isn't perfect, rub it back and forth until it is! I line my bottom lid, then my top. Make sure your line is fatter on the outside and tapers in to almost nothing on the inside. Unless you like heavier liner. In which case, ignore me!
Step#5- Mascara
Two coats of black mascara. I used Glam'eyes by Rimmel in black. Cus that's what I have right now. And I heart Zooey Dechanel.
BOOM! Done-zo!

Make up DO's
- Practice makes perfect!
Make up DON'Ts
- Don't be afraid to try new colors. Make up is suppose to be FUN!
- Don't do a bold eye color with a bold lip color. You'll look like a hooker.
- Don't forget to blend, blend, blend!
- Don't get too concerned with what every fashion/beauty magazine (or me, for that matter!) says to do. They all contradict one another anyhow!
Peace out, girl scouts!
Les
Todays Post was brought to you by:
-The Ocean Breaths Salty by Modest Mouse
-Always by Blink 182
-Jude Law and a Semester Abroad by Brand New
-A strawberry kiwi Shasta
No comments:
Post a Comment